Google Ads Editor: How To Bulk-Edit Campaigns In 2026
Categories: Legal Marketing Strategies
 Abram Ninoyan
Founder & Senior Performance Marketer
Credentials: Google Partner, Google Ads Search Certified, Google Ads Display Certified, Google Ads Measurement Certified, Google Analytics (IQ) Certified, HubSpot Inbound Certified, HubSpot Social Media Marketing Certified, Conversion Optimization Certified
Expertise: Google Ads, Meta Ads, Conversion Rate Optimization, GA4 & Google Tag Manager, Lead Generation, Marketing Funnel Optimization, PPC Management
LinkedIn Profile
Managing a law firm's paid search campaigns means constant adjustments, updating bids across practice areas, swapping ad copy for seasonal promotions, pausing underperforming keywords, and launching n...
Google Ads Editor: How To Bulk-Edit Campaigns In 2026
Managing a law firm's paid search campaigns means constant adjustments, updating bids across practice areas, swapping ad copy for seasonal promotions, pausing underperforming keywords, and launching new location-targeted ad groups. Doing all of that inside the browser-based Google Ads interface, one click at a time, is brutally slow. That's exactly the problem Google Ads Editor solves. It's a free desktop application from Google that lets you make bulk changes to your campaigns offline, review everything, and then push updates live in a single sync.
At GavelGrow, we manage PPC campaigns for over 500 law firms, and Google Ads Editor is a tool our team uses daily. Whether we're rolling out new ad copy across dozens of personal injury ad groups or adjusting bids for a criminal defense firm expanding into neighboring counties, Editor cuts hours of manual work down to minutes. It's one of the most practical advantages a firm (or its agency) can have when ad spend needs to translate directly into signed cases, not wasted clicks.
This guide walks you through everything you need to get started: downloading and installing the latest version, navigating the interface, and using its most powerful features to bulk-edit campaigns efficiently. We wrote it for attorneys and legal marketing managers who either run their own Google Ads or want to better understand what their agency should be doing behind the scenes. By the end, you'll know exactly how to use Google Ads Editor to manage your firm's advertising with more speed, precision, and control.
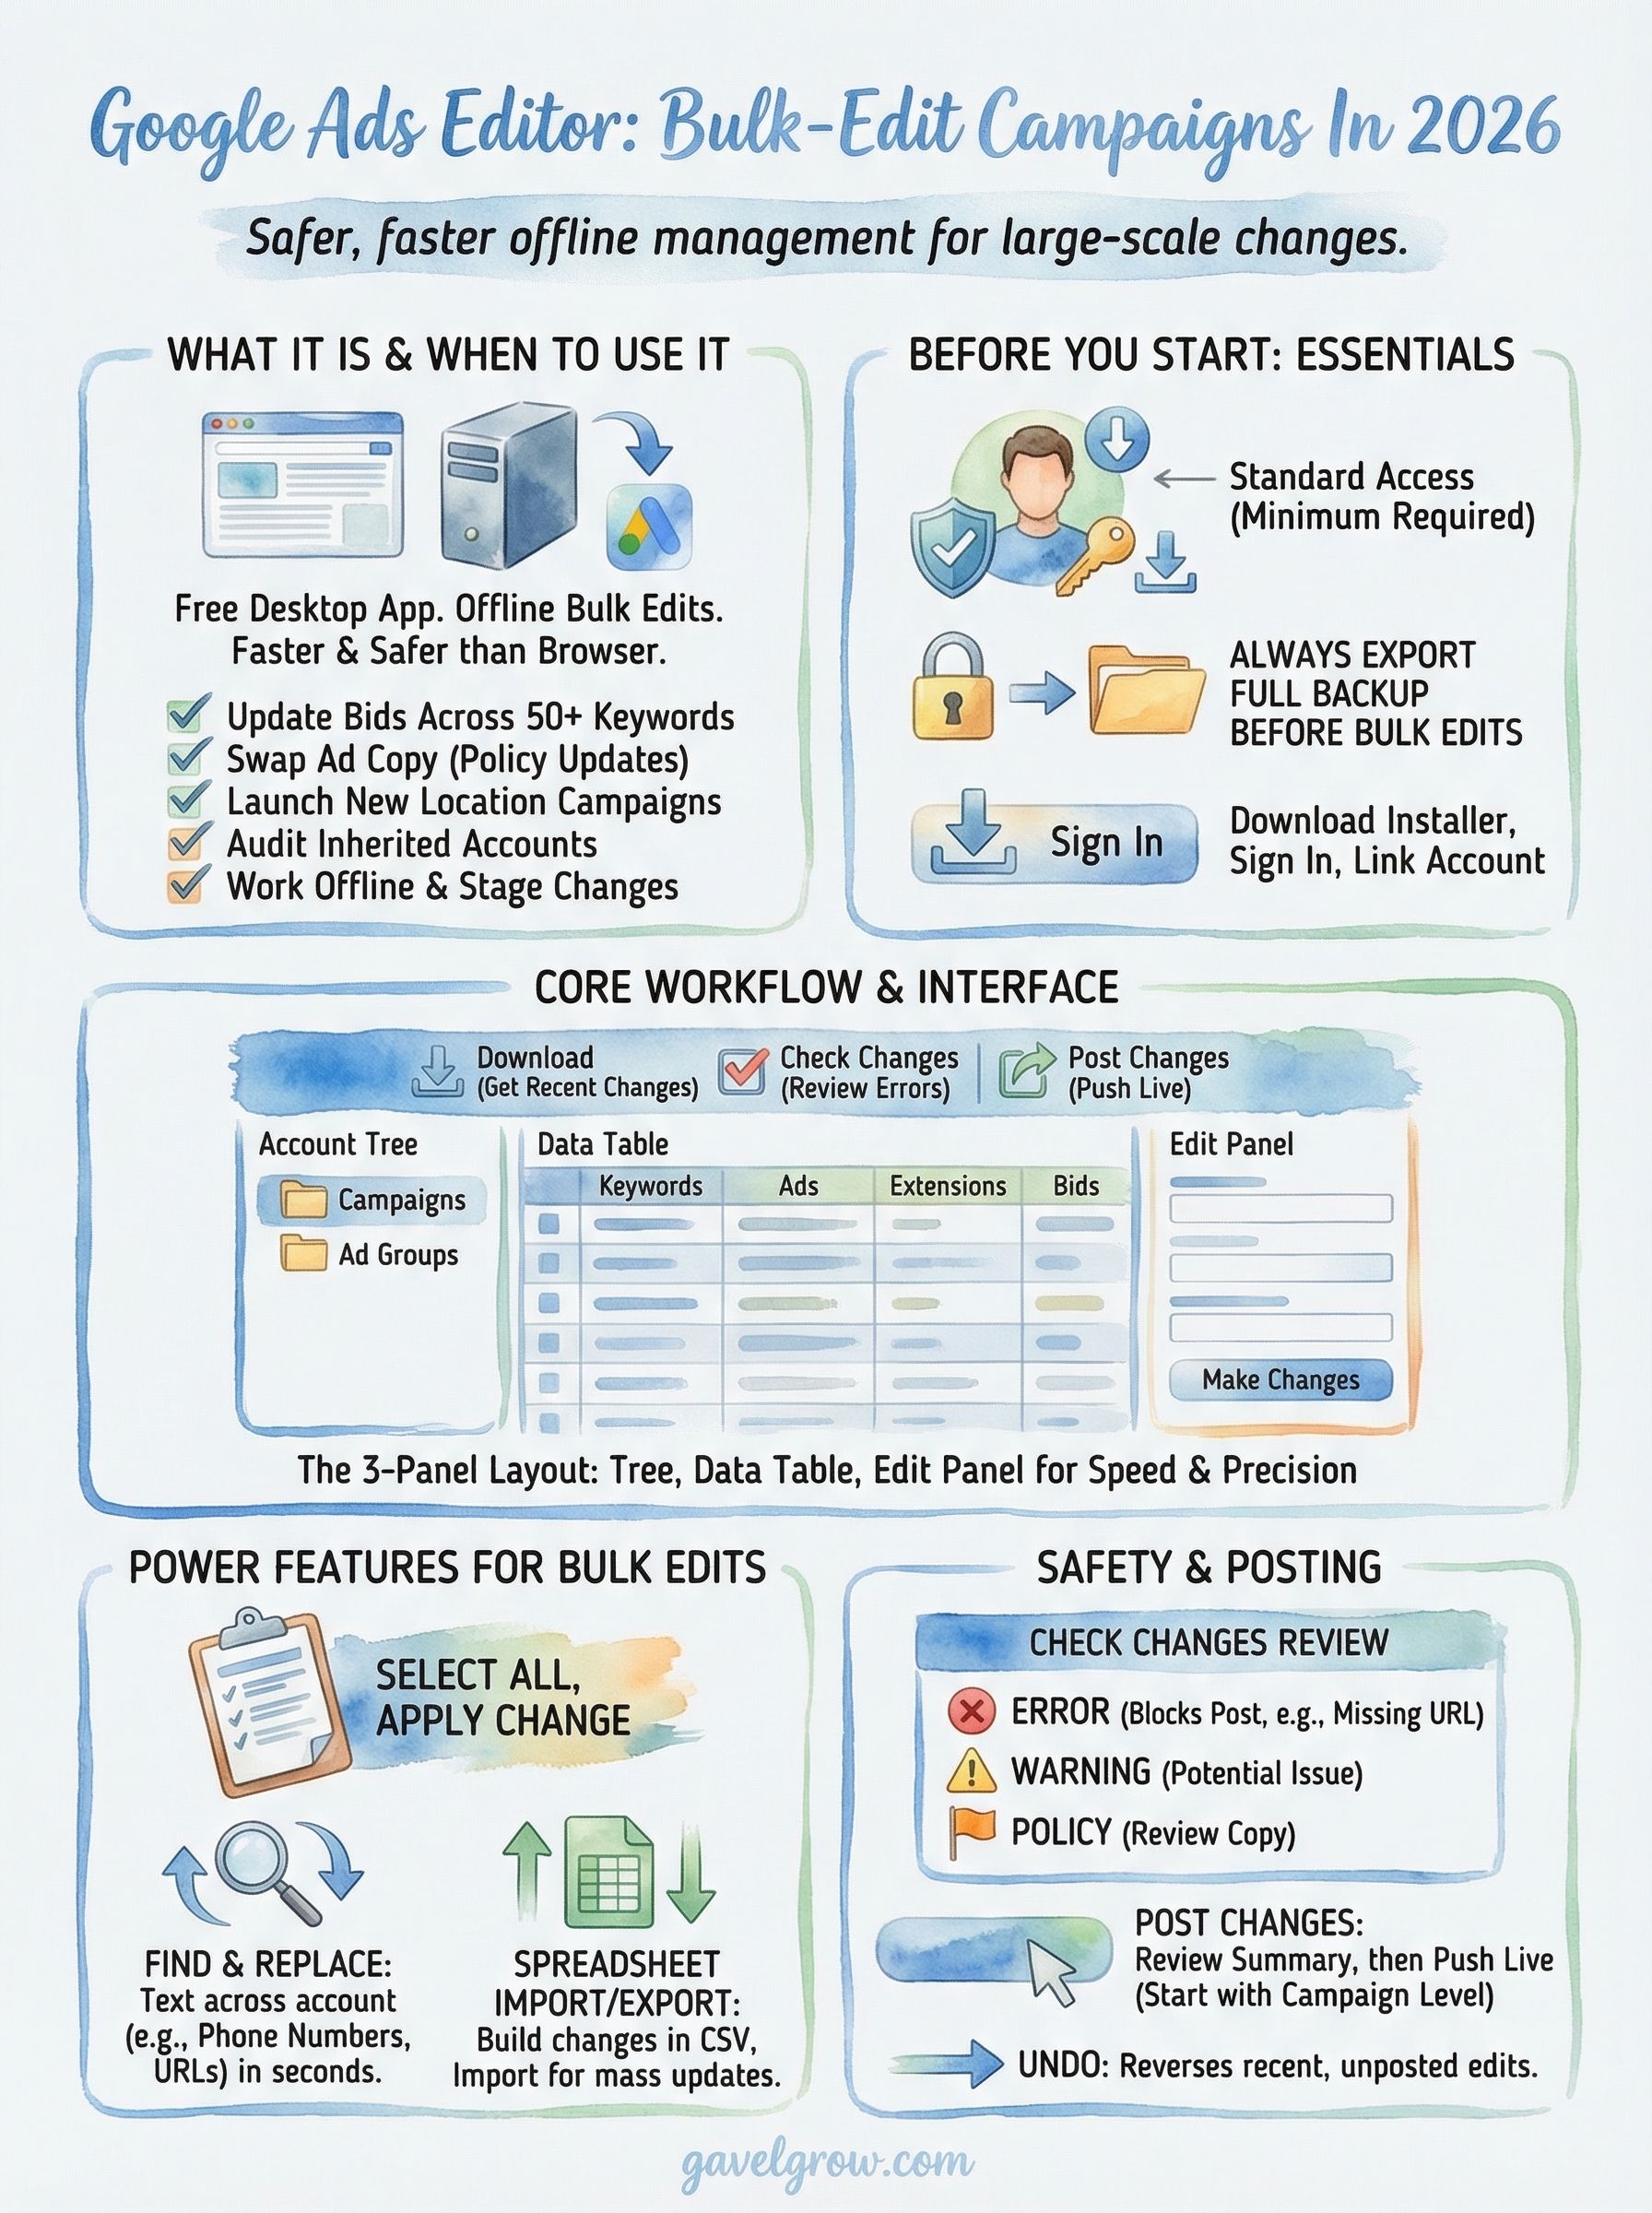
What Google Ads Editor is and when to use it
Google Ads Editor is a free desktop application from Google that lets you manage advertising campaigns outside the browser. You download it to your computer, sync it with your Google Ads account, and make changes locally before pushing anything live. Nothing goes live until you deliberately choose to post your updates, which makes it fundamentally safer and faster than working directly inside the web interface. For law firms managing multiple practice areas, locations, or ad groups, that combination of speed and control is difficult to overstate.
What the tool actually does
At its core, Google Ads Editor works by pulling a full copy of your account onto your computer. Once that data is downloaded, you can edit hundreds or thousands of campaigns, ad groups, ads, and keywords at the same time using bulk editing tools, find-and-replace functions, and spreadsheet imports. Every change sits in a pending state until you review it and decide to post. You are never making live edits by accident, which matters a great deal when your firm is spending thousands of dollars per month on paid search.
The ability to stage and review every change before it goes live is one of the most important safeguards in paid search management.
Beyond bulk edits, the tool also lets you duplicate entire campaigns between accounts. If you manage similar practice-area campaigns across multiple office locations, you can copy a working personal injury campaign, update the location targeting and ad copy, and have a functional new campaign ready in minutes rather than hours.
When Google Ads Editor makes sense
Not every account needs Editor every day. There are specific situations where working inside it is significantly faster and safer than using the browser interface. The table below covers the most common ones:
For law firms specifically, the most common high-value use case is ad copy updates across practice areas. If your firm adds a new service area, updates its intake process, or changes its offer, you need to push that change across potentially dozens of ads. Doing that one ad at a time in the browser costs real time and creates room for error. Editor handles it with a single find-and-replace operation that runs across your entire account.
What Editor does not replace
Editor is a management and editing tool, not an analytics platform. You will not use it to read conversion reports, analyze cost-per-lead trends, or make optimization decisions based on historical data. Those tasks still live inside the Google Ads web interface and platforms like Google Analytics. Editor's job is to help you execute changes faster and more accurately once you already know what adjustments to make.
It also does not support every campaign type equally. Performance Max campaigns, for example, have more limited editing support in Editor compared to standard Search campaigns, so always verify which settings you need to manage directly in the browser before assuming Editor can handle everything.
Before you start: access, roles, and safety
Before you open Google Ads Editor for the first time, three things need to be in order: your Google Ads account access level, the correct user permissions, and a clear safety protocol for handling bulk changes. Skipping this groundwork is how firms accidentally post unreviewed edits or discover mid-session that they cannot push anything live. Taking five minutes to confirm these details now prevents hours of damage control later.
Account access and user roles
Google Ads uses a permission-based access system that directly affects what you can do inside Editor. To download account data, make changes, and post updates, your Google account must have at least Standard access on the account you intend to manage. Admin access is required if you also need to handle billing, invite new users, or adjust account-level settings. Read-only access lets you browse data inside Editor but blocks you from posting any changes.
Check your current access level by navigating to Google Ads, clicking the Tools icon, selecting Access and security, and reviewing the user list. If your role shows as Read-only or Email-only, contact your account administrator before you download Editor and attempt any edits.
Safety steps before your first bulk edit
Bulk editing tools are powerful, and that power runs in both directions. Before you run any large operation inside Editor, download a full account export as a backup. Go to File > Export > Whole account and save the file somewhere you can find it quickly. If a bulk change produces unexpected results, you can reimport that file to restore your previous settings without contacting Google support.
Always export a full backup of your account data before running any bulk operation, regardless of how confident you are in the change.
Also confirm that auto-tagging is enabled in the web interface before you begin working in Editor. Editor does not control that setting, and if it is turned off, the conversion data powering your optimization decisions will be incomplete. Open your account settings in the Google Ads browser interface and verify the checkbox next to Tag your URLs is active.
Step 1. Install and sign in
Getting Google Ads Editor onto your computer takes less than ten minutes. The process covers three short tasks: downloading the installer, running it, and connecting your Google account. Work through each one in order and you will have a fully synced local copy of your account before you move on to any editing.
Download the installer
Visit the Google Ads Editor download page directly from your browser. Google offers separate installers for Windows and macOS, so confirm your operating system before you click download. The file is typically under 200 MB, so even on a slower connection it should finish quickly.
Download Editor only from Google's official page. Third-party sites offering the installer may bundle unwanted software alongside it.
Once the file lands in your downloads folder, open it and follow the on-screen prompts. On Windows, you will run a standard <code>.exe</code> installer and accept the default settings unless your organization's IT policy requires a custom install path. On macOS, drag the Editor icon into your Applications folder when the installation window appears. No additional software or browser extensions are required.
Sign in and link your account
After installation, open Google Ads Editor and you will immediately see a sign-in prompt. Click Sign in with Google and enter the Google account credentials tied to the Ads account you want to manage. Use the account that carries at least Standard access, as you confirmed in the previous section. If your firm uses a Google Workspace account rather than a personal Gmail, enter those credentials here.
Once signed in, Editor shows a list of Google Ads accounts associated with your login. If you manage a single firm account, select it and click OK. If you manage multiple accounts through a Manager Account (MCC), you will see each sub-account listed. Select the specific account you want to work with first and proceed. You can add additional accounts later through File > Add Account without signing out.
After you select your account, Editor prompts you to download your account data. Hold off and click cancel for now. The next section covers the correct way to download data selectively so you avoid pulling more than you need and slowing down your session unnecessarily.
Step 2. Download account data the right way
When you open Google Ads Editor for the first time with a linked account, the default prompt is to download everything at once. For most law firm accounts that is fine, but if your account holds years of historical campaigns, dozens of ad groups, or thousands of keywords, a full download can take several minutes and load data you will never touch. A smarter approach is to download selectively so your session starts fast and your local copy contains exactly what you need.
Choose a targeted download scope
Click Download in the toolbar after signing in. Editor presents two options: Download entire account or download specific campaigns. If you are working on a single practice area, such as updating bids or copy for a personal injury campaign, select Specific campaigns, ad groups, and other statistics and choose only the relevant campaigns. This keeps your local copy lean and your editing sessions faster.
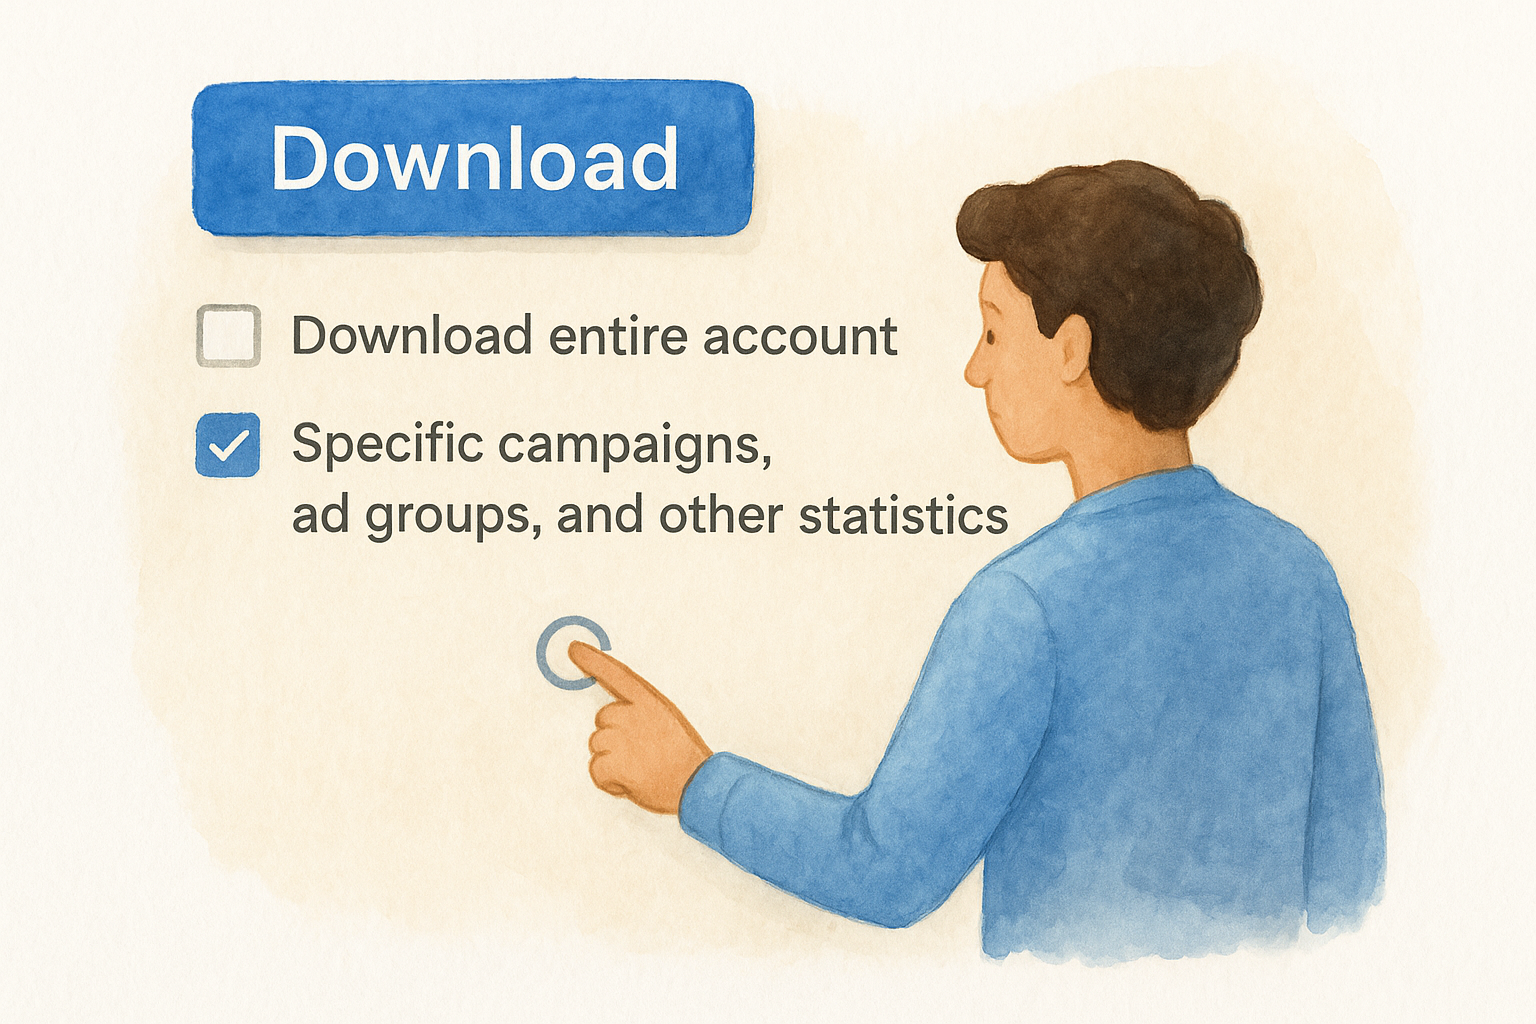
Downloading only the campaigns you plan to edit significantly reduces session load time and lowers the risk of accidentally modifying unrelated parts of your account.
If you do need a full download, for example when auditing an inherited account or preparing a broad rollout, uncheck the option to include performance statistics. Statistics like impression share and quality score add data volume without contributing to the editing tasks you are about to do. You can always pull that data separately inside the Google Ads web interface when you need it for reporting.
Refresh data before each editing session
Account data inside Google Ads Editor does not update automatically once it is downloaded. If someone on your team made changes in the browser-based interface since your last sync, your local copy will be outdated, and posting your edits could overwrite their work without any warning. Before you start any session, click the Download button and choose Get recent changes to pull in only what has changed since your last sync.
The table below shows the three download modes and when to use each one:
After your download completes, check the Last synced timestamp in the bottom toolbar to confirm the data is current before you make any changes.
Step 3. Learn the interface fast
Google Ads Editor organizes everything into a predictable three-panel layout that becomes second nature within a single session. Spend a few minutes clicking through each panel before you start editing, and you will move through the tool without constantly hunting for the right menu or setting. The layout is consistent regardless of whether you are working on search campaigns, keywords, or ad copy, so the mental model you build here applies to every task in the sections that follow.
The three-panel layout
The left panel is your account tree. It lists your campaigns and ad groups in a collapsible hierarchy, exactly like a folder structure on your computer. Click a campaign to expand its ad groups, then click an ad group to see its contents in the center panel. The center panel is your data table, displaying the specific items tied to whatever you selected on the left, whether that is keywords, ads, or extensions. Every row in this table is an editable record.
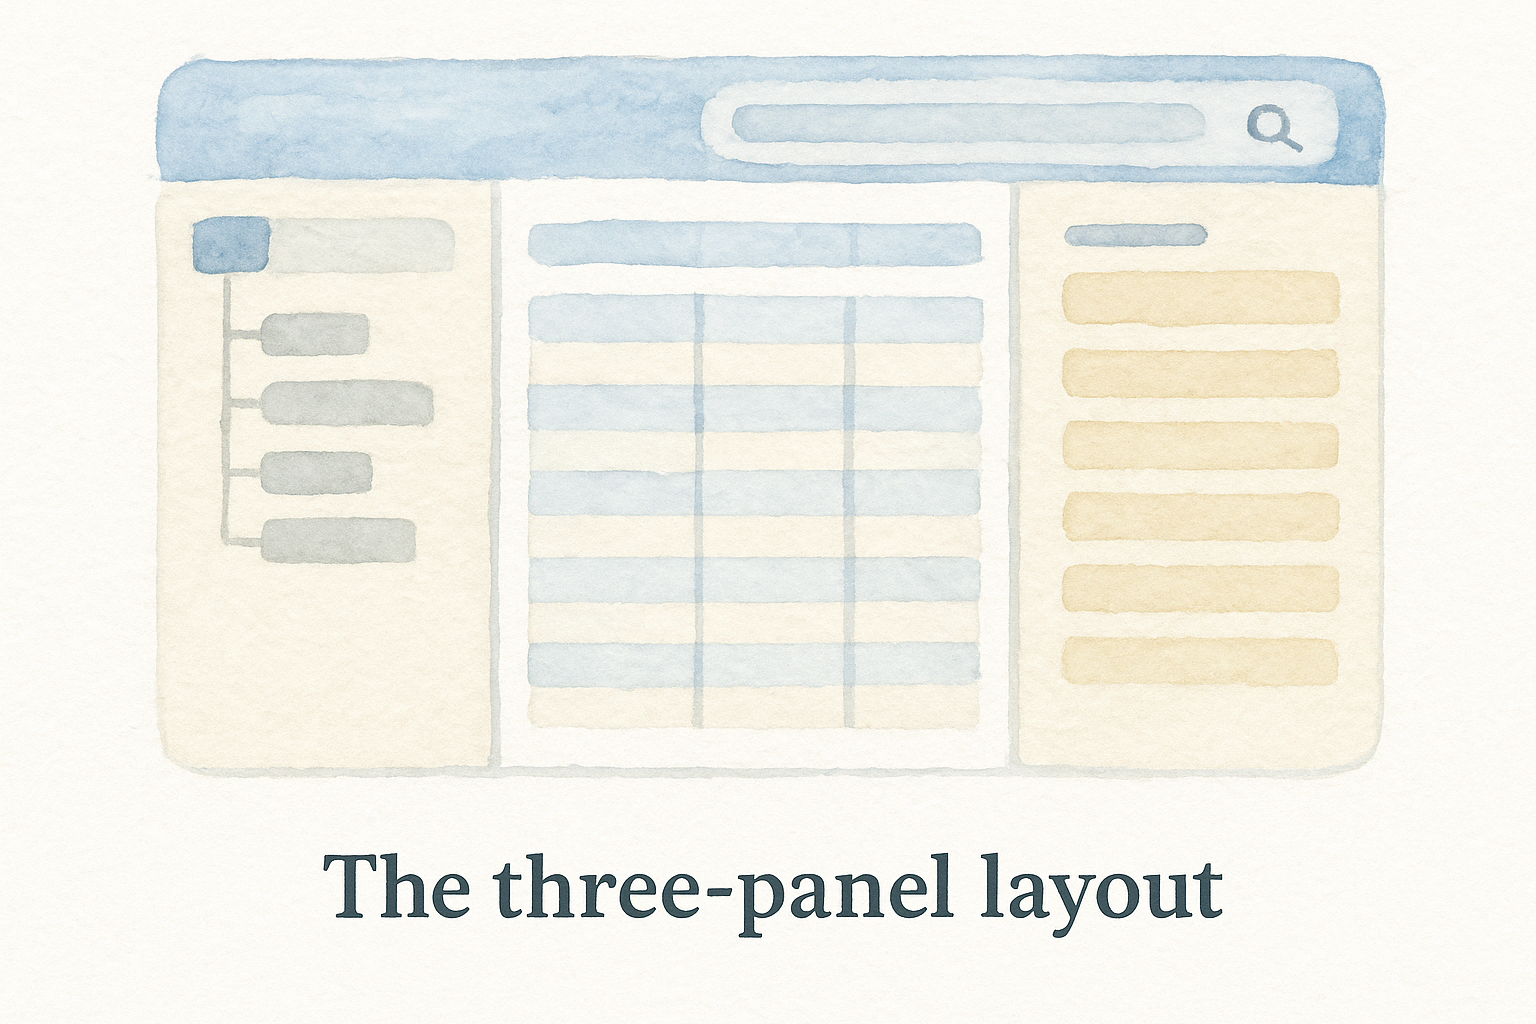
Clicking at the campaign level in the left panel shows you all items within that campaign at once, which is the fastest way to review everything before making bulk changes.
The right panel is your edit panel. When you select a row in the center panel, that record's individual fields appear on the right side of the screen, ready for direct editing. You can also edit directly inside the data table by double-clicking any cell. Both methods update the same record, so use whichever feels faster for the task at hand.
The toolbar and search bar
The toolbar at the top contains the core action buttons you will use in every session: Download, Post Changes, Check Changes, and Undo. Get familiar with where each one sits before you start editing so you are not searching for Post Changes after completing a large bulk update.
Directly below the toolbar sits a search and filter bar that most users overlook during their first session. Type any keyword, ad text, or URL fragment into this bar to filter the center panel down to only matching records. If you need to find every ad that contains a specific phone number or outdated landing page URL, this bar locates them in seconds across your entire account. Use it alongside the campaign tree on the left to scope your view before making any changes.
Step 4. Build and edit campaigns in bulk
This is where Google Ads Editor delivers its biggest advantage over the browser interface. Once your data is downloaded and you understand the layout, you can select hundreds of items simultaneously, apply a single change, and watch it propagate across your entire account in seconds. The bulk editing tools are straightforward, but knowing the right sequence for each task keeps you from creating errors you have to track down later.
Select, copy, and duplicate at scale
Start by selecting the items you want to edit in the center data panel. Use <code>Ctrl+A</code> (Windows) or <code>Cmd+A</code> (macOS) to select all records currently visible, or hold <code>Shift</code> and click to select a contiguous range of rows. To pick non-adjacent rows, hold <code>Ctrl</code> (Windows) or <code>Cmd</code> (macOS) and click each one individually. Once your selection is active, any change you make in the right edit panel applies to every selected record at the same time.
Selecting from the campaign level in the left panel before using Ctrl+A gives you the most targeted bulk selection, limiting changes to a single practice area rather than your entire account.
To duplicate a campaign, right-click it in the left panel and select Copy, then right-click the account name at the top of the tree and choose Paste. The copied campaign lands in a pending state with all its ad groups, ads, and keywords intact. Update the campaign name, adjust location targeting, and swap out ad copy before posting. This workflow cuts the time to launch a new office location campaign from hours to under thirty minutes.
Run find-and-replace across your account
The find-and-replace function handles text changes across every ad, keyword, or URL in your account simultaneously. Access it by pressing <code>Ctrl+H</code> (Windows) or <code>Cmd+H</code> (macOS). The dialog box lets you define the exact text to find, the replacement text, and the specific data type to search within, such as final URLs, headlines, or descriptions.
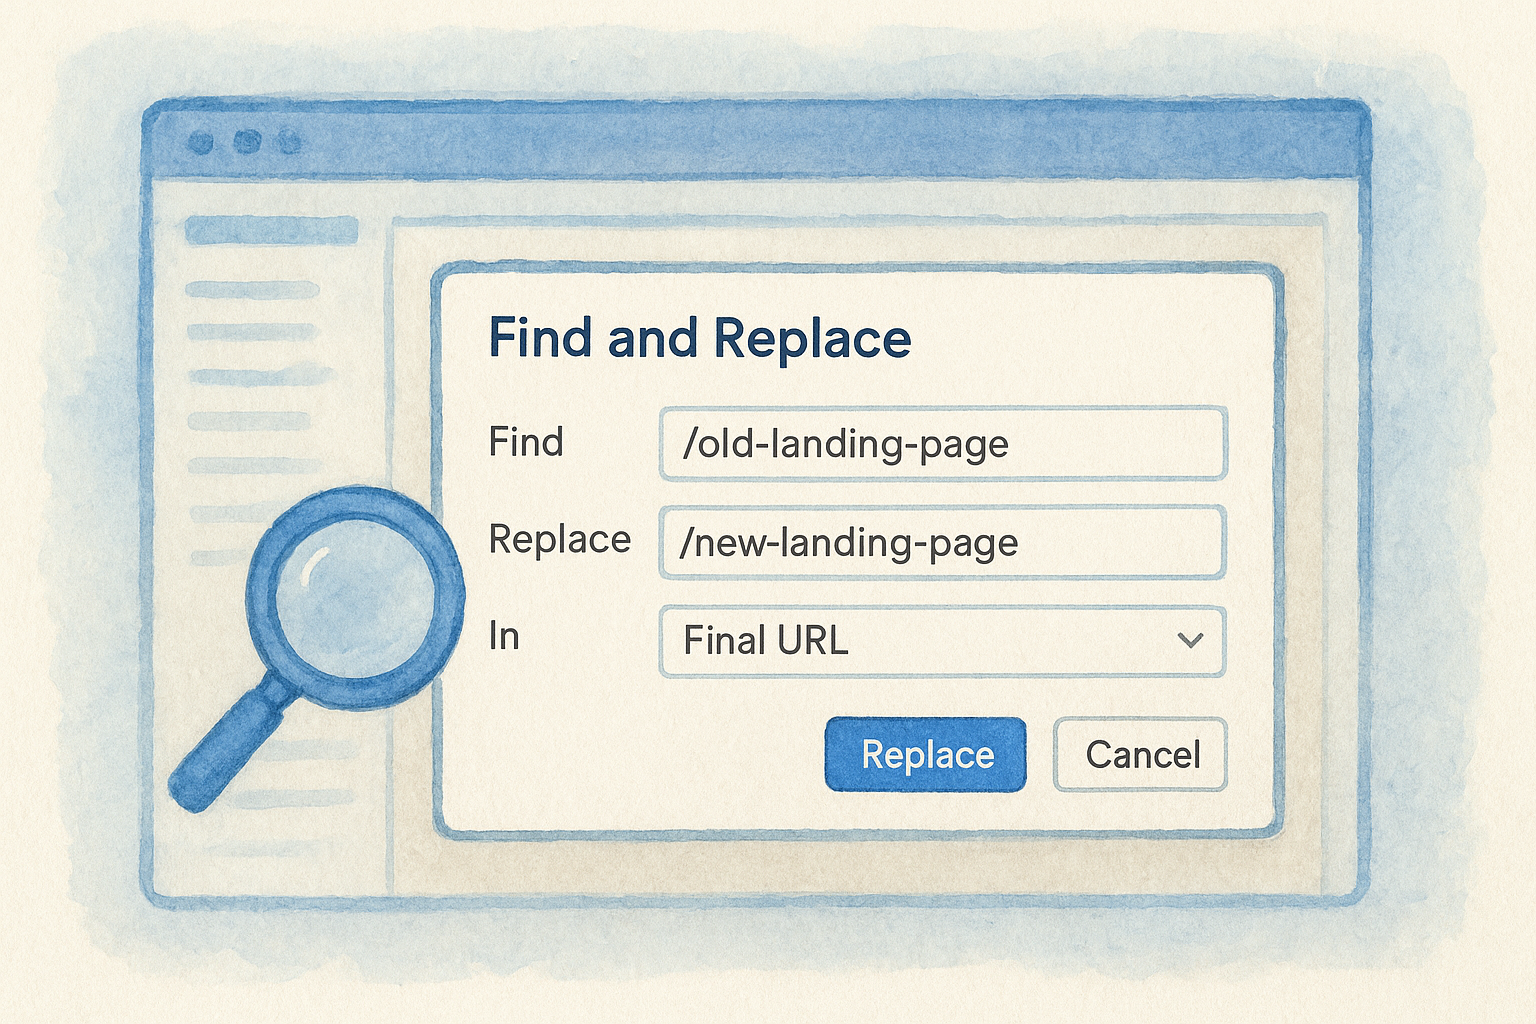
Use the template below as a starting point when updating a landing page URL across an entire campaign:
Run a preview before confirming the replacement. Editor shows you every record it will modify so you can catch unintended matches before committing the change.
Step 5. Import and export with spreadsheets
Google Ads Editor gives you a direct bridge between your account and spreadsheet software through its import and export functions. This is the most efficient way to handle large-scale changes when the data originates outside the tool itself, such as a list of new keywords from a research session, updated landing page URLs from a site redesign, or fresh ad copy approved by your firm's managing partner. Knowing the correct file format and column structure before you start saves you from failed imports and confusing error messages.
Export your account data to a spreadsheet
To export your current campaign data, navigate to File > Export and choose either Whole account or Selected items depending on the scope of your task. Editor saves the file as a <code>.csv</code> format that opens cleanly in Google Sheets or Microsoft Excel. Once open, you have a structured view of every campaign, ad group, ad, or keyword row that you exported, with each attribute sitting in its own labeled column.
Export only the specific entity types you plan to edit rather than the full account, so your spreadsheet stays focused and easier to work with.
Use this exported file as your editing template. Modify the values directly in the spreadsheet, keeping the column headers and row structure intact. The most common columns you will work with for ad copy updates are listed below:
Build and import bulk changes via CSV
Once you have updated your spreadsheet, save the file as a .csv and return to Editor. Go to File > Import > Import CSV and select your file. Editor reads each row and maps it to the corresponding record in your local account copy. Any row that matches an existing record updates it, and any row that does not match creates a new item.
Before you run the import, confirm that your spreadsheet column headers exactly match the column names Editor uses. A single misspelled header causes that entire column to be ignored without a visible warning, which means your changes silently fail to apply. Use the exported file as your template every time rather than building a spreadsheet from scratch, and that problem never comes up.
Step 6. Review errors, warnings, and policies
Before you post a single change, Google Ads Editor gives you a dedicated review layer that flags problems in your pending updates. This step is not optional. Skipping it and posting directly is how firms accidentally push ads with broken URLs, disapproved copy, or structural errors that cause campaigns to stop serving. The Check Changes button in the toolbar runs a full validation sweep across every pending item in your account and returns a prioritized list of issues you need to resolve.
The error panel and what each indicator means
Click Check Changes and the issues panel opens at the bottom of the screen. Editor sorts every problem into one of three categories, each with a distinct severity level. Understanding what each category means tells you immediately which items block your post and which ones you can address after the fact.
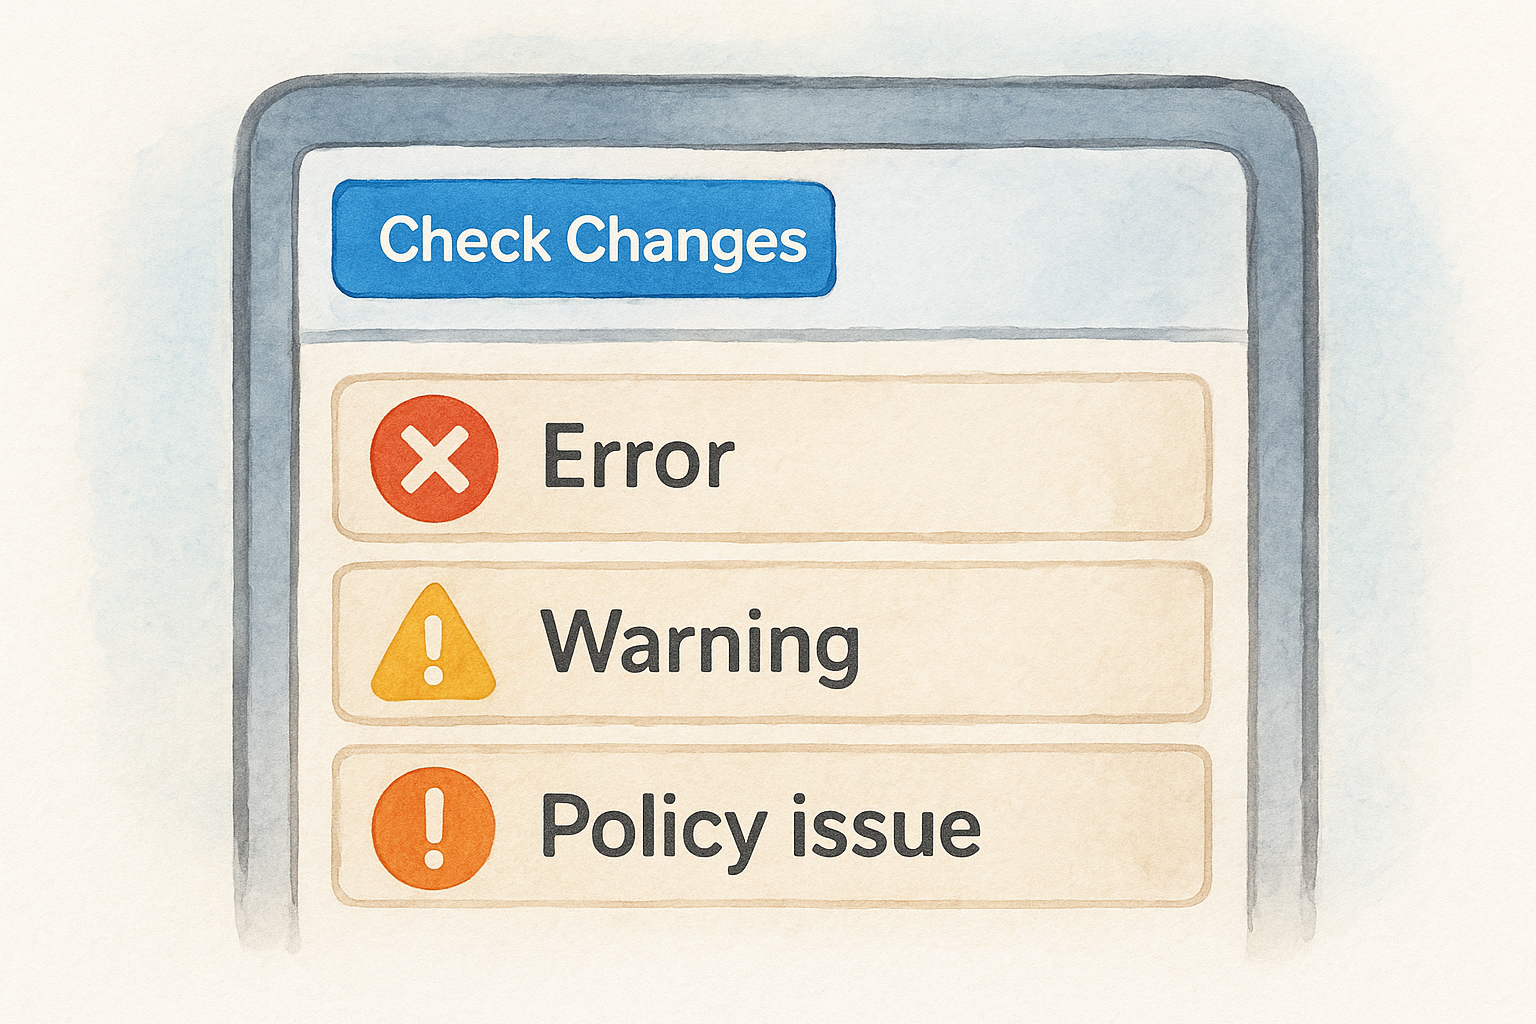
Red errors always require resolution before Editor lets you post the affected items. Common red errors for law firm accounts include missing final URLs, ad groups with no active ads, and keyword match types formatted incorrectly after a spreadsheet import. Click any error row in the panel to jump directly to the affected record in the center data table, fix the field, and return to the panel to confirm the error clears.
How to handle policy warnings before you post
Policy warnings require more judgment than structural errors because some are informational and others will cause ad disapproval after posting. When you see an orange policy flag, click the row to read the specific policy it references, then cross-check the flagged text against Google's advertising policies to confirm whether the copy needs to change.
Resolving policy warnings before posting prevents the post-submission disapproval cycle that can leave your campaigns without active ads for hours or longer.
For law firm ad copy, the most common policy warnings involve claims of guaranteed outcomes, superlatives without substantiation, and phone number formatting in ad text. Address each one directly in the right edit panel, then rerun Check Changes to confirm the warning is gone before moving to the next step.
Step 7. Post changes and roll back safely
Once you have resolved every red error and reviewed your policy warnings, you are ready to push your pending updates live. Google Ads Editor gives you precise control over what gets posted and when, so you never have to commit your entire pending queue in one move. Taking a structured approach to this final step protects your campaigns from partial updates and makes any necessary recovery much faster.
Post your changes in the right order
Click Post Changes in the top toolbar to open the posting dialog. Before you confirm, review the summary that appears, which lists the total number of items you are about to update, add, or remove. If the numbers look larger than expected, close the dialog and return to the center data panel to verify your selection scope before proceeding.
Post changes at the campaign level first rather than posting your entire account queue at once, so any issue surfaces in a contained area before it affects your broader account.
To post only a subset of your pending changes, select the specific campaigns or ad groups in the left account tree and choose Post Selected Campaigns from the posting dialog. This approach works well when you are rolling out updates across multiple practice areas on different schedules and want to confirm one campaign serves correctly before advancing to the next.
Roll back changes when something goes wrong
If a posted change produces unexpected results, such as ads serving to the wrong locations or headlines appearing in unintended combinations, your fastest recovery path is the backup file you exported before the session started. Go to File > Import > Import CSV, select your backup file, and reimport your previous settings. Editor stages the restored data as a new set of pending changes, which you then post to overwrite the problematic update.
For smaller mistakes caught immediately after posting, the Undo function inside the tool handles recent edits before they are posted. However, once changes are live in your account, Undo no longer reverses them, which is exactly why the pre-session backup matters. If you skipped that step, you can still recover individual settings by pulling the change history from the Google Ads web interface under Tools, then Audit Log, to identify the exact values that existed before your edit and restore them manually.
Step 8. Speed tools: find replace and rules
Google Ads Editor includes two speed tools that separate efficient managers from those grinding through repetitive tasks one item at a time: find-and-replace for text changes and automated rules for condition-based account actions. Both tools work across your entire account or within a scoped selection, and both compress what would otherwise take thirty minutes of manual edits into under two minutes.
Use find-and-replace for text changes
The find-and-replace function in Google Ads Editor runs a text swap across any specified data type in seconds. Access it by pressing <code>Ctrl+H</code> on Windows or <code>Cmd+H</code> on macOS. The dialog gives you control over four key fields: the text to find, the replacement text, the data field to search (such as Final URL, Headline, or Description), and the scope (selected campaigns or the whole account).
Run a preview inside the find-and-replace dialog before confirming any change, so you can see every affected record and catch unintended matches before they go live.
Use the template below when updating a phone number across all active ads in your account:
After the preview confirms the correct records are targeted, click Replace and verify the total count of modified items matches your expectation before moving to post.
Set up automated rules to manage bids and budgets
Automated rules inside the Google Ads web interface let you trigger account actions based on performance conditions, such as pausing a keyword when its cost per conversion rises above your target or increasing a bid when impression share drops below a set threshold. While you configure rules in the browser-based interface rather than directly in Editor, understanding them completes your speed workflow because rules handle ongoing maintenance between your manual editing sessions.
To create a rule, open Google Ads, navigate to the Campaigns, Ad groups, or Keywords tab, click the tools icon, and select Automated rules. Set your condition, action, frequency, and notification preference, then save. Pair a rule that pauses low-performing keywords with a regular Editor session to push refined replacements, and your account stays optimized without requiring constant manual intervention between syncs.
Next steps
You now have a complete workflow for using Google Ads Editor from installation through bulk editing, spreadsheet imports, error review, and safe posting. The fastest way to build confidence with the tool is to run your first session on a single campaign, make a small change, review it with Check Changes, and post it live. That single cycle teaches you more than reading about it ever will.
From there, the natural progression is refining your intake to make sure every click you manage through Editor is converting into a consultation. Ad copy, bids, and targeting only matter when the landing page and intake form are ready to handle the traffic. If you want to see exactly where your current campaigns are losing signed cases, get a free strategy consultation from GavelGrow and we will audit your account, identify the gaps, and build a roadmap to fix them.